Blog

  • Lesson 5: Views – Returning HTML, JSON & Random Poems

    In this lesson we’ll make Django think and respond:

    • Build function-based views (FBVs)
    • Return HTML, JSON, and redirects
    • Pass data from views to templates
    • Create a random poem view

    We’ll use your existing project:

    • Project: hello_django
    • Main folder: config
    • Apps: home, blog
    • Port: 8011
      (So URLs look like: http://your-server-ip:8011/...)

    Throughout the lesson I’ll highlight “Common mistake” boxes to help you avoid typical beginner errors.


    1. What is a View?

    A view is a Python function that:

    1. Receives a request (request)
    2. Returns a response (HttpResponse, template, JSON, redirect, etc.)

    Basic shape:

    def my_view(request):
        return HttpResponse("Hello from a view!")
    

    Views live in each app’s views.py:

    • home/views.py
    • blog/views.py

    2. Home App Views (HTML + Redirect)

    We’ll start with the home app: the root page /, /about/, and a redirect /go-about/.

    2.1. Update home/views.py

    Open:

    home/views.py

    and make sure it looks like this:

    from django.http import HttpResponse
    from django.shortcuts import render, redirect   # ✅ VERY IMPORTANT IMPORTS
    
    def home_page(request):
        return HttpResponse("<h1>Welcome to Hello Django!</h1>")
    
    def about_page(request):
        # This will look for templates/home/about.html
        return render(request, "home/about.html")
    
    def go_to_about(request):
        # Redirect to the URL named "about"
        return redirect("about")
    

    🧠 Common mistake #1 – “NameError: ‘render’ is not defined”
    Always import render (and redirect) from django.shortcuts at the top of the file:

    from django.shortcuts import render, redirect
    

    2.2. Home URLs – home/urls.py

    Now connect these views to URLs.

    Open (or create):

    home/urls.py

    from django.urls import path
    from . import views
    
    urlpatterns = [
        path("", views.home_page, name="home"),          # /
        path("about/", views.about_page, name="about"),  # /about/
        path("go-about/", views.go_to_about, name="go-about"),  # /go-about/
    ]
    

    🧠 Common mistake #2 – URL points to non-existent view
    If you write views.go_to_about but your function is named go_about, you’ll get:
    AttributeError: module 'home.views' has no attribute 'go_to_about'.
    ✅ Make sure the function name in the URL matches the function name in views.py exactly.


    2.3. Include home.urls in the Project URLs

    This should already be done from previous lessons, but confirm that:

    config/urls.py contains:

    from django.contrib import admin
    from django.urls import path, include
    
    urlpatterns = [
        path('admin/', admin.site.urls),
        path('', include('home.urls')),     # root URLs from home app
        path('blog/', include('blog.urls')) # blog URLs under /blog/
    ]
    

    Now test:

    • http://your-server-ip:8011/ → “Welcome to Hello Django!”
    • http://your-server-ip:8011/about/ → template page
    • http://your-server-ip:8011/go-about/ → redirects to /about/

    🧠 Common mistake #3 – Redirect fails
    If you see NameError: 'redirect' is not defined, you forgot:

    from django.shortcuts import redirect
    

    3. Blog App – Poem Detail & List Views

    Now we’ll work in the blog app and create:

    • A poem detail view: /blog/poems/1/
    • A poem list view: /blog/poems/

    3.1. Update blog/views.py

    Open:

    blog/views.py

    import random
    from django.shortcuts import render
    from django.http import JsonResponse
    
    def poem_detail(request, id):
        """
        Simple detail view that just shows the poem ID.
        Later we will connect this to a real database.
        """
        return render(request, "blog/poem_detail.html", {"id": id})
    
    def poem_list(request):
        """
        Pass a list of poem titles to the template.
        """
        poems = ["Poem One", "Poem Two", "Poem Three"]
        return render(request, "blog/poems.html", {"poems": poems})
    
    def random_poem(request):
        """
        Homework view – shows a random poem.
        """
        poems = [
            "The sun rises on ancient hills.",
            "Whispers of wind echo in the valley.",
            "Lonely stars guard the night sky.",
            "Dreams fall like rain on silent earth."
        ]
        poem = random.choice(poems)
        return render(request, "blog/random_poem.html", {"poem": poem})
    
    def sample_json(request):
        """
        Simple JSON API-style response.
        """
        data = {
            "name": "Omar",
            "language": "Django",
            "status": "Learning Views"
        }
        return JsonResponse(data)
    

    🧠 Common mistake #4 – “module ‘blog.views’ has no attribute ‘poem_detail’”
    This happens when your URL says views.poem_detail but you never created the function.
    ✅ Always create the view function before wiring it in urls.py.


    3.2. Blog URLs – blog/urls.py

    Open:

    blog/urls.py

    from django.urls import path
    from . import views
    
    urlpatterns = [
        path("poems/", views.poem_list, name="poem_list"),             # /blog/poems/
        path("poems/<int:id>/", views.poem_detail, name="poem_detail"),# /blog/poems/1/
        path("random-poem/", views.random_poem, name="random_poem"),   # /blog/random-poem/
        path("api/info/", views.sample_json, name="sample-json"),      # /blog/api/info/
    ]
    

    🧠 Common mistake #5 – 404 on /blog/poems/
    If Django shows a 404 and the error page lists only
    blog/poems/<int:id>/ but not blog/poems/, it means you forgot:

    path("poems/", views.poem_list, name="poem_list")
    

    4. Templates for the Blog Views

    Create these files:

    4.1. blog/templates/blog/poem_detail.html

    <h1>Poem Detail Page</h1>
    <p>Poem ID: {{ id }}</p>
    <p>(Later we will load the poem from the database.)</p>
    

    4.2. blog/templates/blog/poems.html

    <h1>Poem List</h1>
    
    <ul>
        {% for poem in poems %}
            <li>{{ poem }}</li>
        {% endfor %}
    </ul>
    

    4.3. blog/templates/blog/random_poem.html

    <h1>Your Random Poem</h1>
    <p>{{ poem }}</p>
    
    <p>Refresh the page to get another one!</p>
    

    And for the home about page:

    4.4. home/templates/home/about.html

    <h1>About This Site</h1>
    <p>This page is rendered from a template using Django's render() function.</p>
    

    5. JSON Response – First Step Toward APIs

    Your JSON view is already a tiny API:

    def sample_json(request):
        data = {
            "name": "Omar",
            "language": "Django",
            "status": "Learning Views"
        }
        return JsonResponse(data)
    

    Because blog/urls.py is included under path('blog/', include('blog.urls')) in config/urls.py, the full URL is:

    http://your-server-ip:8011/blog/api/info/
    

    🧠 Common mistake #6 – 404 on /api/info/
    If you go to /api/info/ you get 404 because the route is under /blog/.
    ✅ Always remember the app prefix. For this project:

    • Home URLs: / and /about/ etc.
    • Blog URLs: /blog/...

    6. Homework – Random Poem View (You Already Built It!)

    Goal: Create a view that displays a random poem.

    We already included the solution above:

    • View: random_poem in blog/views.py
    • URL: path("random-poem/", views.random_poem, name="random_poem")
    • Template: blog/random_poem.html

    Final URL in browser:

    http://your-server-ip:8011/blog/random-poem/
    

    Refresh the page to see different poems.


    7. Checklist – Avoiding Errors

    Before you move to the next lesson, confirm:

    ✔ Imports

    • home/views.py has: from django.http import HttpResponse from django.shortcuts import render, redirect
    • blog/views.py has: import random from django.shortcuts import render from django.http import JsonResponse

    ✔ URLs and Views Match

    • Every views.X in home/urls.py and blog/urls.py has a matching function def X(...) in the correct views.py.
    • config/urls.py includes both: path('', include('home.urls')), path('blog/', include('blog.urls')),

    ✔ Paths You Can Visit

    • / → home text
    • /about/ → About template
    • /go-about/ → redirects to /about/
    • /blog/poems/ → poem list
    • /blog/poems/1/ → poem detail with ID
    • /blog/random-poem/ → random poem
    • /blog/api/info/ → JSON response

    If all of these work, you’ve successfully completed Lesson 5: Views with clean, error-free code.
  • Lesson 4 — URLs & Routing in Django

    In this lesson, you will learn how Django finds and displays pages using URLs & routing.
    By the end of today’s lesson, you will be able to:

    ✔ Understand how project URLs and app URLs work together
    ✔ Use path() and re_path()
    ✔ Create routes with parameters like <id>
    ✔ Add URLs for your own apps (home and blog)
    ✔ Prepare for the homework: /poems/<id>/ route

    This lesson uses your actual project:

    hello_django/
        config/
            urls.py
        home/
            views.py
            urls.py
        blog/
            views.py
            urls.py
    

    🚀 1. How Django Handles URLs

    When you open your project in the browser:

    http://YOUR-SERVER-IP:8011/
    

    Django starts looking for URLs in this order:

    1. hello_django/config/urls.py → main router
    2. It includes URLs from each installed app
    3. Then each app handles its own routes

    Think of it like this:

    • config/urls.py = traffic police
    • home/urls.py = routes for homepage, about page, etc.
    • blog/urls.py = routes for blog posts

    📁 2. Project URLs (config/urls.py)

    Open:

    hello_django/config/urls.py
    

    It should look like this:

    from django.contrib import admin
    from django.urls import path, include
    
    urlpatterns = [
        path('admin/', admin.site.urls),
        path('', include('home.urls')),     # Home app
        path('blog/', include('blog.urls')), # Blog app
    ]
    

    This tells Django:

    • When the URL starts with nothing ("") → go to home.urls
    • When URL starts with "blog/" → go to blog.urls

    📁 3. App URLs

    Each app needs its own urls.py.
    You already created them in Lesson 3 — now we add routes.


    🏠 home/urls.py

    home/
        urls.py
    
    from django.urls import path
    from . import views
    
    urlpatterns = [
        path('', views.home_page, name='home'),
        path('about/', views.about_page, name='about'),
    ]
    

    home/views.py

    from django.http import HttpResponse
    
    def home_page(request):
        return HttpResponse("<h1>Welcome to Home Page</h1>")
    
    def about_page(request):
        return HttpResponse("<h1>About Page</h1>")
    

    Now the following works:

    • /
    • /about/

    📝 blog/urls.py

    blog/
        urls.py
    
    from django.urls import path
    from . import views
    
    urlpatterns = [
        path('', views.blog_index, name='blog_index'),
    ]
    

    blog/views.py

    from django.http import HttpResponse
    
    def blog_index(request):
        return HttpResponse("<h1>Blog Home</h1>")
    

    This creates:

    /blog/


    🧭 4. Using path() and re_path()

    path() — the one you will use 99% of the time

    path('post/<int:id>/', views.post_detail)
    

    re_path() — for advanced URLs using regex

    (We rarely need this now.)

    Example:

    from django.urls import re_path
    re_path(r'^article/(?P<slug>[-\w]+)/$', views.article_detail)
    

    🔢 5. Route Parameters (Very Important)

    Django lets you capture values from the URL.

    Example:

    /blog/post/5/
    

    In the URL:

    path('post/<int:id>/', views.post_detail)
    

    In the view:

    def post_detail(request, id):
        return HttpResponse(f"Post ID = {id}")
    

    🎯 6. Homework

    Create a route: /poems/<id>/

    Inside blog/urls.py:

    path('poems/<int:id>/', views.poem_detail, name='poem_detail'),
    

    Inside blog/views.py:

    def poem_detail(request, id):
        return HttpResponse(f"This is poem number {id}")
    

    Test it:

    http://YOUR-IP:8011/blog/poems/7/
    

    📝 2. Lesson 4 Quiz

    Here is your beginner-friendly quiz, exactly matching what you learned.


    🔥 Quiz: Lesson 4 — URLs & Routing

    Question 1

    What is the purpose of config/urls.py in a Django project?

    A. It stores all HTML templates
    B. It is the main router that includes each app’s URLs
    C. It stores database models
    D. It contains CSS files


    Question 2

    Which function is used for basic routing in Django?

    A. route()
    B. url()
    C. path()
    D. redirect()


    Question 3

    Given this route:

    path('post/<int:id>/', views.post_detail)
    

    What URL will display the post with ID 7?

    A. /post/7/
    B. /post?id=7
    C. /post/<7>/
    D. /7/post/


    Question 4

    Which import is required to include URLs from an app?

    A. from django.urls import link
    B. from django.urls import re_path
    C. from django.urls import include
    D. from django.shortcuts import path


    Question 5

    True or False:
    If you forget to create urls.py inside your app, Django will crash with a routing error.


    Question 6

    What does this view return?

    def poem_detail(request, id):
        return HttpResponse(f"This is poem number {id}")
    

    A. Always “This is poem number 1”
    B. A page showing the poem based on the URL ID
    C. An error
    D. An empty page


    Question 7

    Which URL belongs to the blog app if your config/urls.py has:

    path('blog/', include('blog.urls'))
    

    A. /blog/poems/5/
    B. /poems/5/
    C. /home/blog/poems/5/
    D. /blog-poems/5/


    ▶️ 7. Run Your Server on Port 8011

    Use:

    python manage.py runserver 0.0.0.0:8011
    

    If everything is correct, you now have working routes:

    URLWhat it shows
    /Home Page
    /about/About page
    /blog/Blog homepage
    /blog/poems/1/Poem #1

    Homework and quiz solutions


    🎉 Lesson 4 Summary

    By now you understand:

    ✔ How Django routes URLs
    ✔ How project and app URLs work together
    ✔ How to pass parameters in routes
    ✔ How to build dynamic pages like /poems/7/
    ✔ How your project’s folder structure works with routing

  • Lesson 3: Django Apps

    📘 Lesson 3: Django Apps

    🔰 Introduction

    In Django, a project is the whole website — but the real power comes from apps.
    Each feature inside a Django project is built as a separate app so your project stays clean, organized, and professional just like modern company websites.

    Examples of apps:

    • blog
    • accounts (login system)
    • store
    • api
    • poems (for your future poetry system)

    By the end of this lesson, you will:
    ✔ Understand what an app is
    ✔ Create your first Django app
    ✔ Install the app inside settings.py
    ✔ Build the foundation for your project’s future apps
    ✔ Be ready for the homework: create a blog app


    🧩 1. What is a Django App?

    A Django app is:

    • A module inside your project
    • Responsible for doing one job
    • Reusable (you can copy it into another project)
    • Easy to maintain

    Think of a Django project like a company building:

    FloorPurpose
    ProjectEntire building
    AppA department (HR, IT, Finance)

    Each department does one job.
    Each app does one job.


    🏗 2. Creating New App

    Make sure your virtual environment is active:

    source venv/bin/activate
    

    Go inside your Django project directory (where manage.py is):

    cd hello_django
    

    Create your new app:

    python manage.py startapp home
    

    You will now see this new folder:

    home/
        admin.py
        apps.py
        models.py
        views.py
        urls.py (you will create this)
    

    This app is now part of your project — but Django does not use it yet.

    You must install it.


    ⚙️ 3. Installing the App in settings.py

    Open:

    hello_django/config/settings.py
    

    Find the INSTALLED_APPS section.

    Add your app:


    INSTALLED_APPS = [
        'django.contrib.admin',
        'django.contrib.auth',
        'django.contrib.contenttypes',
        'django.contrib.sessions',
        'django.contrib.messages',
        'django.contrib.staticfiles',
        'core',
        'home', # Your apps
    ]


    That’s it — your app is now registered!


    🌐 4. Creating the New App View

    Inside home/views.py:

    from django.http import HttpResponse
    
    def homepage(request):
        return HttpResponse("Welcome to my first Django app!")
    

    Now create a urls.py file inside the app:

    home/urls.py
    

    Add this:

    from django.urls import path
    from . import views
    
    urlpatterns = [
        path('', views.homepage, name='homepage'),
    ]
    

    🔗 5. Include App URLs in Project URLs

    Open:

    hello_django/config/urls.py
    

    Update to:

    from django.contrib import admin
    from django.urls import path, include
    
    urlpatterns = [
        path('admin/', admin.site.urls),
        path('core/', include('core.urls')),  
        path('', include('home.urls')),
    ]
    

    Now visit:

    run the server: 
    python manage.py runserver 0.0.0.0:8011
    
    then visit:
    http://your-server-ip:8011/
    

    You should see:

    “Welcome to my first Django app!”


    🚨 Beginners Troubleshooting

    ❗ “ModuleNotFoundError: No module named ‘home’”

    You created the app outside the project folder.
    Make sure home/ is next to manage.py.


    ❗ “TemplateDoesNotExist”

    You added templates before creating the templates folder.
    We will fix this in Lesson 6.


    ❗ Running server on busy port

    Use a different port:

    python manage.py runserver 0.0.0.0:8011
    

    (We use 8011 in all lessons to avoid conflicts)


    📝 Homework

    Create a new app called blog

    Your task:

    1. Create the app python manage.py startapp blog
    2. Add it to INSTALLED_APPS
    3. Create a view:
      Inside blog/views.py def blog_home(request): return HttpResponse("This is the blog homepage.")
    4. Create urls.py for the app
    5. Include it in project urls.py at: /blog/

    Example:

    http://your-server-ip:8011/blog/
    

    It should display:

    This is the blog homepage.


    You said:
  • Lesson 2: Install Django on Ubuntu + Create Your First Project

    🚀 Introduction

    In this lesson, you will install Django on your Ubuntu server, create your development environment, and run your first Django project online using your server’s IP address. By the end of the lesson, you will have two working pages:

    • / → Success / Home page
    • /about/ → Simple About page

    This lesson is intentionally beginner-friendly, with detailed steps and a troubleshooting section based on real issues that learners often face.


    🧰 1. Update Your Server & Install Required Tools

    SSH into your server:

    ssh youruser@your-server-ip
    

    Update and install required packages:

    sudo apt update && sudo apt upgrade -y
    sudo apt install -y python3 python3-venv python3-pip git
    

    Verify:

    python3 --version
    pip3 --version
    

    📁 2. Create a Root Folder for All Django Projects

    A good habit is to keep all your Django projects in one folder:

    mkdir -p ~/django-projects
    cd ~/django-projects
    

    Create a new project folder:

    mkdir lesson2_project
    cd lesson2_project
    

    🧪 3. Create & Activate a Python Virtual Environment

    A virtual environment ensures every project has its own isolated dependencies:

    python3 -m venv venv
    source venv/bin/activate
    

    You should now see:

    (venv)
    

    If you re-login later, reactivate with:

    source ~/django-projects/lesson2_project/venv/bin/activate
    

    🟢 4. Install Django

    Inside the active venv:

    pip install --upgrade pip
    pip install django
    

    Check version:

    python -m django --version
    

    🛠️ 5. Create Your Django Project

    Use the name config for the base settings:

    django-admin startproject config .
    

    Now your folder contains:

    manage.py  
    config/  
    venv/
    

    🌐 6. Run Django on Your Server (Port 1011)

    Django’s development server can run on any port.

    We’ll use 1011:

    python manage.py runserver 0.0.0.0:1011
    

    Open in your browser:

    http://YOUR_SERVER_IP:1011
    

    You should see:

    🚀 “The install worked successfully!”


    🏗️ 7. Create Your First App

    Every Django feature lives inside an app.

    Create one called core:

    python manage.py startapp core
    

    🧩 8. Register the App

    Open your settings:

    nano config/settings.py
    

    Find INSTALLED_APPS and add:

    'core',
    

    Save and exit.


    9. Create Your First View (Home Page)

    Open:

    nano core/views.py
    

    Add:

    from django.http import HttpResponse
    
    def hello(request):
        return HttpResponse("""
            <h1 style='text-align:center;color:#007bff;'>Success!</h1>
            <p style='text-align:center;'>I finished Lesson 2 in Django!</p>
            <p style='text-align:center;font-size:14px;color:gray;'>
            View generated by Webmaster and More's Django server.
            </p>
        """)
    

    🌍 10. Add URLs for Your App

    Create:

    nano core/urls.py
    

    Insert:

    from django.urls import path
    from . import views
    
    urlpatterns = [
        path('', views.hello, name='hello'),
    ]
    

    Then connect it in config/urls.py:

    from django.contrib import admin
    from django.urls import path, include
    
    urlpatterns = [
        path('admin/', admin.site.urls),
        path('', include('core.urls')),
    ]
    

    📄 11. Create the /about/ Page

    In core/views.py:

    def about(request):
        return HttpResponse("""
            <div style='text-align:center;padding:40px;'>
                <h1 style='color:#0066ff;'>My Path to Full Stack</h1>
                <h3>This Django training will help me upgrade to Full Stack Developer.</h3>
                <p>Setting clear goals is the first step to achieving them. Keep pushing forward!</p>
                <p style='font-size:14px;color:gray;'>
                    View generated by webmasterandmore's Django server.
                </p>
            </div>
        """)
    

    Then add the URL:

    path('about/', views.about, name='about'),
    

    🖥️ 12. Visit Your Pages

    Home page:

    http://YOUR_SERVER_IP:1011/
    

    About page:

    http://YOUR_SERVER_IP:1011/about/
    

    Both should work now.


    🚑 Troubleshooting (Beginner-Friendly)

    These are real errors you may encounter (and how to fix them).


    1. Browser shows HTTPS error (ERR_SSL_PROTOCOL_ERROR)

    Cause: You used https:// instead of http://.

    Fix:
    Use:

    http://YOUR_SERVER_IP:1011
    

    2. DisallowedHost at /

    Error:

    Invalid HTTP_HOST header …
    

    Cause: You didn’t add your server IP to ALLOWED_HOSTS.

    Fix:

    ALLOWED_HOSTS = ['YOUR_SERVER_IP', 'localhost', '127.0.0.1']
    

    3. Port already in use

    Error:

    Error: That port is already in use
    

    Fix: Choose a different port:

    python manage.py runserver 0.0.0.0:1012
    

    Check used ports:

    sudo ss -tulnp
    

    4. favicon.ico 400 errors

    Ignore these — browsers request /favicon.ico automatically.


    📝 Quick Exercise for Lesson 2

    1. What is the purpose of creating a virtual environment?
    2. How do you create a new Django project using django-admin?
    3. How do you start the development server on port 1011?
    4. In which file do you register your newly created Django app?
    5. What is the purpose of core/urls.py?

    Answers PDF: ✔ Delivered in previous message
    (lesson2_answers.pdf)


    🏡 Homework for Lesson 2

    1. Make sure your home page works on port 1011.

    2. Create a custom “Success” message.

    Add your name + your company.

    3. Take a screenshot of your working page.

    4. Create the /about/ page.

    (PDF contains the required answer.)


    🎉 Conclusion

    You have successfully:

    • Installed Django on Ubuntu
    • Created a project and an app
    • Built your first dynamic pages
    • Solved common beginner issues
    • Hosted your project on your own server

    This completes Lesson 2 of the Django Full Stack Developer Path.

  • Lesson 1: Introduction to Django

    Lesson 1 – Introduction to Django & How It Works

    🎯 Lesson Objectives

    By the end of this lesson, you will understand:

    • What Django is and why it’s used by professional developers
    • The MVT (Model–View–Template) architecture
    • How Django handles requests internally
    • The core parts of a Django project
    • What you will build in this course

    This lesson is designed for beginners, but it also connects to real workplace scenarios—such as maintaining, modifying, or extending existing Django applications used within your company.


    🧩 1. What is Django?

    Django is a high-level Python web framework for building modern, secure, and scalable web applications.

    It is designed to help developers:

    • Build applications faster
    • Reduce repetitive tasks
    • Maintain clean, organized code
    • Work with databases easily
    • Use templates for powerful front-end pages

    Django is used by companies like:

    • Instagram
    • Mozilla
    • Shopify
    • Dropbox
    • National Geographic

    And many internal company systems worldwide.


    🏗️ 2. Django’s MVT Architecture

    Django uses an architecture called MVT — Model, View, Template.

    Think of it as three layers working together:

    🔹 Model

    • Represents the data (database structure)
    • Example: a table of employees, products, articles, etc.
    • Written in Python
    • Django automatically builds the database for you via migrations

    🔹 View

    • Python functions/classes that handle the logic
    • Example: “Get all articles and show them to the user”
    • Views prepare the data and send it to the template

    🔹 Template

    • The HTML page the user sees
    • Can contain variables, loops, conditions
    • Example: a page listing all products from the database

    🔁 How they work together

    Browser Request → URL → View → Model (optional) → Template → Browser Response
    

    This flow is the core of Django development. Once you understand this, you can read or build any Django project.


    🗂️ 3. The Django Project Structure

    When you create a Django project, you’ll see this structure:

    project_name/
        manage.py
        project_name/
            settings.py
            urls.py
            wsgi.py
        app_name/
            models.py
            views.py
            urls.py
            templates/
            static/
    

    What you will mostly work with:

    File / FolderPurpose
    models.pyDatabase structure
    views.pyPage logic
    templates/HTML pages
    urls.pyPage routing

    This separation keeps projects clean and scalable — which is why companies choose Django for serious web development.


    🧠 4. Example Real-World Scenario

    Let’s imagine your company has an internal Django dashboard for managing customers, products, or inventory.

    A user visits:

    /products/
    

    Here is what happens:

    1. URL: The request matches a URL pattern in urls.py.
    2. View: Django calls the view that handles products.
    3. Model: That view fetches product data from the database.
    4. Template: The view sends the data into an HTML template.
    5. Response: The browser displays a product list.

    As you learn Django, you will be able to update pages, add fields, create new features, fix bugs, and extend the system without breaking anything.


    🏋️ 5. Course Direction

    During this course you will learn to:

    • Build Django projects from scratch
    • Understand and modify existing projects inside your company
    • Work with templates, models, and views confidently
    • Create APIs with Django REST Framework
    • Deploy your projects on a real Ubuntu server
    • Use GitHub for professional version control
    • Build a final portfolio project

    Everything will be project-based and hands-on.


    ✏️ 6. Lesson 1 Quick Exercise

    Answer these three questions (mentally or in your notebook):

    1. What is a Model?
    2. What is a View?
    3. What is a Template?

    If you can explain each in one sentence, you are ready for Lesson 2.

    Answers


    🚀 Next Step

    Say “Start Lesson 2” whenever you’re ready, and I will guide you through:

    • Installing Django on your Ubuntu server
    • Creating your first project
    • Running it in the browser
  • How This Plugin Helps You Track Visitors and Users Inside WordPress — Without Guesswork

    How This Plugin Helps You Track Visitors and Users Inside WordPress — Without Guesswork

    As a website owner, you’re often left asking:

    • Who’s visiting my site?
    • What pages are people reading the most?
    • Are my logged-in users actually using the content I provide?

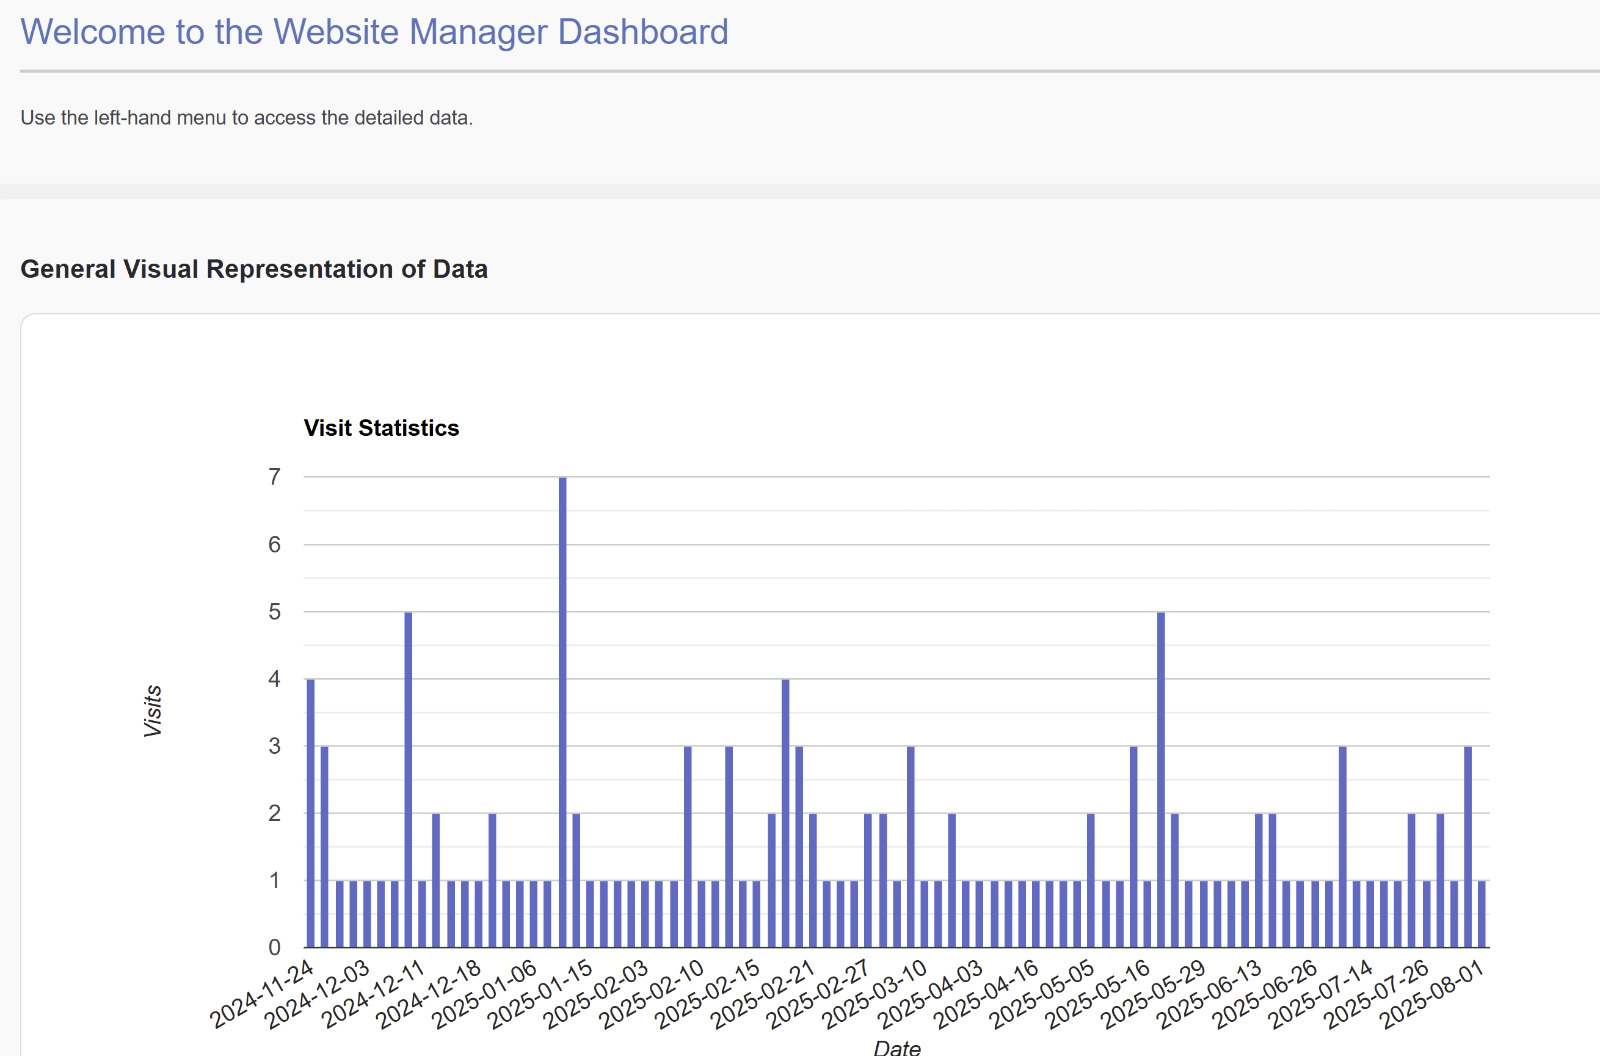
    That’s exactly why I built the Website Manager Dashboard — a custom plugin that gives you all this data inside your WordPress admin panel, with no need to switch between apps or tools.


    🔍 What It Does:

    ✅ 1. Google Analytics Integration (for guest traffic)

    • Tracks total page views over time
    • Breaks down views by page title and date
    • Shows visitor country and city
    • Export data to Excel (daily, monthly, yearly)

    ✅ 2. Internal User Activity Tracker

    • Tracks user logins by name
    • Shows what pages each user visited
    • Helps schools, teams, and memberships monitor actual usage

    ✅ 3. Full Role-Based Settings

    • Control who can see the dashboard
    • Choose which user roles get tracked
    • Clean dashboard experience for teachers, editors, or shop managers

    🛠 Customization Available

    Want this connected to your CRM?
    Need to track only specific pages or roles?
    Want the data sent to Google Sheets, Slack, or elsewhere?

    ✅ I offer full customization for your workflow.


    Interested in using this plugin or a similar custom dashboard? Contact us

  • The Power of AI-Driven WordPress Plugins: Automate Anything, Anywhere

    The Power of AI-Driven WordPress Plugins: Automate Anything, Anywhere

    The Power of AI‑Driven WordPress Plugins: Automate Anything, Anywhere

    Artificial intelligence is no longer an abstract idea—it’s a practical tool that businesses of all sizes can use to improve efficiency and deliver better experiences. WordPress, with its open architecture and massive plugin ecosystem, is an ideal platform for harnessing AI. By adding AI-driven plugins to your WordPress site you can automate repetitive tasks, generate content, respond to customers around the clock, and uncover insights hidden in your data. This article explains why AI‑enhanced plugins are a game‑changer, provides real‑world examples, shows how to deploy your own AI services on a subdomain, and outlines the benefits for small businesses and freelancers.

    Why AI‑Enhanced Plugins Are Revolutionary

    Most automation plugins follow simple rules—publish posts on a schedule, send a welcome email when someone subscribes. They’re useful but limited because they can’t learn from outcomes. AI-driven plugins combine machine learning, natural language processing and predictive analytics to make intelligent decisions. They adapt based on patterns and improve over time. According to the U.S. Small Business Administration, AI tools free owners from routine tasks and even help them solve problems before they happen. Microsoft adds that AI solutions lower operational costs and provide data-driven insights. By embedding these capabilities in WordPress, your site becomes a smart assistant that not only automates tasks but also helps you make better decisions.

    Real Examples: Automation That Works for You

    Content creation and optimization. AI writing assistants like ContentBot.ai can draft entire blog posts or polish existing text, saving hours and ensuring consistent tone. Tools such as Rank Math integrate with the WordPress editor to suggest headlines, optimize for keywords, and add metadata and internal links automatically. AI‑powered SEO plugins like WordLift add structured data and knowledge graphs so search engines understand your content better, improving visibility.

    Customer support and engagement. AI chatbots embedded in WordPress forms can answer frequently asked questions, collect visitor details, and guide users to relevant pages—no human required. Knowledge‑base plugins use AI to generate support articles and provide instant answers via chat. Machine‑learning spam filters detect and block unwanted comments and malicious emails, keeping your site clean.

    Marketing, lead scoring and analytics. AI marketing plugins analyze visitor behaviour and segment your audience. They can score leads based on engagement, predict which products or posts will resonate, and trigger personalised emails at optimal times. Jetpack’s social features use AI to draft and schedule posts while providing insights into which content performs best. With these tools your marketing budget goes further because every message is based on data rather than guesswork.

    Why WordPress Is the Perfect AI Playground

    WordPress powers over 40 % of the web because it’s flexible and extensible. Its plugin system allows developers to hook into nearly any part of the platform, and its REST API lets WordPress act as a headless back‑end for any application. Through this API, an AI plugin can expose endpoints that other websites—Shopify stores, Wix sites, custom apps—can call to generate content or retrieve analytics. Authentication methods such as OAuth and JSON Web Tokens ensure these endpoints are secure. When combined with modern hosting and caching, a WordPress installation can serve as a reliable AI microservice for multiple front‑ends.

    Deploying AI Plugins on a Subdomain

    To make your AI capabilities available beyond your main site, consider installing them on a dedicated subdomain such as ai.yourdomain.com. Hosting AI functions separately isolates them from your primary site, improving security and performance. Using the WordPress REST API, you can create custom endpoints that accept requests—such as a blog post draft or customer data—and return AI‑generated summaries, keyword lists, or lead scores. Because the API communicates via JSON, any platform can consume these services. Freelancers and agencies can even offer AI functions as a hosted service, providing API keys to clients who want AI features on their own sites. A subdomain architecture turns your WordPress installation into an on‑demand AI engine that supports a variety of websites and applications.

    Benefits for Small Businesses and Freelancers

    AI‑driven plugins are particularly valuable for entrepreneurs who juggle multiple roles. Automating tasks like writing, editing, customer support and marketing frees up time to focus on growth. AI also reduces costs by replacing manual work and lowering the need for additional staff. By analyzing your data, AI highlights trends and opportunities, helping you stock the right products or prioritize the most promising leads. Chatbots and personalized recommendations improve customer satisfaction, and predictive analytics show what offerings are most likely to succeed. These tools democratize automation, allowing small players to deliver experiences once reserved for big companies. Selling AI-powered services to clients—such as blog‑writing assistants or lead‑scoring endpoints—can also create new revenue streams. The result is a more efficient operation, happier customers, and a stronger bottom line.

    Expanding AI Capabilities

    Translation and localization. Serving a global audience means adapting your content into multiple languages. AI-powered translation plugins use advanced language models to automatically convert posts and pages, so you can reach new markets without hiring human translators.

    Security and maintenance. Keeping a website secure and up to date is another area where AI excels. Smart security plugins monitor traffic patterns, detect malware, block spam comments and even manage backups and software updates automatically, giving you peace of mind.

    These additional capabilities ensure your site remains accessible, localized and secure while you focus on growth.

    Ready to Automate Your Business?

    The combination of AI and WordPress puts powerful automation within reach of everyone. AI‑enhanced plugins automate content creation, customer support and marketing while delivering insights that help you make smarter decisions. Thanks to WordPress’s REST API, you can even expose your AI features on a subdomain and provide services to any website. Want a smart plugin that works like your AI assistant? Book a free call and let’s build your first AI‑powered solution together. We’ll help you choose the right tools, set up your subdomain and integrate AI into your workflow. The future of automation is here—embrace it today!